Table of Contents
The RBG/ISP printer
There are two categories of printer:
- printer that are accessible from the pool client
- printer that are accessible from laptops etc.
The first category is set up entirely on the pool clients and can be used immediatly, except for the clientssh login-computer.
The other printer end with “-extern” and are availabe with authentication, so you need to enter a username and a password.
available laser printer for the pool clients
You can choose between the following laser printers:
- C005 - This is the default printer and it prints on the drupierer.
- E003 - This is the printer in the night-pool.
- Drupierer-Druckquota - The printing quota is used.
- It's possible to sort, to punch, to staple or use a different output tray for the printing jobs.
These printers are all set up on the pool-computer and you can use them both via a GUI-application and via the command line tool inserting …
lp -d $PRINTERNAME
… in the command line. This only works on the pool-computer. The clientssh1-3 computer have no permission for that. Due to that these printing jobs will be ignored.
PDF printer
If there is a PDF printer on the pool-computer it can be used to convert any file from an application into a PDF.
All print-outs can be found in the folder /tmp/PDF. They will be deleted when the computer is restarted.
duplex print
The pool-computer are printing everything in duplex by default. This means they print on the front and back side of a page. The Drupierer doesn't, so here you have to set it up. If you're using remote-printing from your own laptop, you have to set this up in the settings of the printer driver.
n-up: print multiple pages on one
This is configurable via the setting of the printer. If you are printing using the command line please use the parameter …
-o number-up=2, -o number-up=4
or
-o number-up=16
… to print 2,4 or 16 input-pages on one output-page.
It's also possible as alternative to use a commando line program before printing to edit the file you want to print. psnup works with PostScript-files (pdf2ps converts PDFs):
psnup -4 old.ps new.ps
pdfnup arbeitet direkt auf PDFs:
pdfnup --nup 2x2 --outfile new.pdf old.pdf
pdfnup offers more useful functions, like the restriction of the page to be edited via –pages. Take a look at
pdfnup --help
problems with the printing
- The following problems might occur:
- A printer is out of toner:
- The operator will renew the toner. Please write a mail to sysop@rbg.informatik.tu-darmstadt.de to informs us about an empty toner. We are monitoring the printers and try to replace the cartridges in time, but sometimes the remaining quantity displayed differs too much from the actually state.
- The job is dismissed by the system:
- Please check if you're out of printing-quota for the month.
view jobs
Alle Aufträge sind auf der Webseite einsehbar, sodass jeder überprüfen kann, wann sein Auftrag an der Reihe ist, bzw. auf welchem Drucker der Auftrag gedruckt wurde: All jobs can be displayed on this website so everybody knows at which point their job is first in the queue and which printer will print the job.
printing-quota
To cut on the paper and toner consumption we have a printing-quota. This is a restriction on the number of monthly printable pages. This number will be reseted on the beginning of every month to 50 pages.
If you want to know your quota you can look it up here after entering your RBG/ISP account data.
Please note that printing via the laptop will also have an effect on the quota.
note on duplex and printing-quota
If you have a printing job with odd page numbers (e.g. 3, 5 or 7 pages) there will be one page added to the quota, even though the last page is empty. The printer is not able to recognize that the last page is empty. Because this is page is counted anyways this has an effect on the quota.
As a workaround there is the possibility to change the settings from double-sided printing (duplex) to one-sided printing or you print the first even pages (e.g. 1-2, 1-4,…) and print the last pages separately.
printing via laptop
All pool printer are reachable via https with private laptops inside the TUD-network. Due to technical reasons this does not apply for laptop which are contacted to the pool computer.
Because there are often problems with Windows and OSX, we recommend to print via the SMB protocol.
There are the following printer available:
- C005-extern-windows - print via print-quota
- E003-extern-windows - print via print-quota
The printer are reachable under:
https://printer.rbg.informatik.tu-darmstadt.de:631/printers
You have to authenticate yourself with your RBG/ISP account.
Windows / OSX / Linux
The less complicated way to embed the printer of the RBG/ISP is using the SMB protocol. It might be possible to use IPP/https, but earlier it showed that there are problems with the authentication.
All printers which have been released, can be looked up under
\\printer.rbg.informatik.tu-darmstadt.de - Windows
smb://printer.rbg.informatik.tu-darmstadt.de - Linux
Now you can see the query for user and password. Please enter your RBG/ISP login data. After successful login you will see following printer:
- C005-extern-windows
- LZI-extern-windows
- E003-extern-windows
Double click on the wanted printer and choose in the following printer driver query either the generic → MS Publisher Imagesetter or the corresponding PostScript driver.
Drupierer
The Drupierer:
- All users are allowed to print as much as they have to every month. The problem of the already used quota for the month is essentially done.
- The printing of lecture notes, slide collections and comparable teaching materials on the HP laserprinter is forbidden according to the user agreement. The Drupierer-printer on the other side (but fee-based, look later) is enabled for that and is especially for the fast printing of lecture notes etc. The ban of the using of the HP-printer for lecture notes is based in the fact that the printer is quite slow and takes a long time for processing of the material. Single lecture notes can take easily slow down the laserprinter for at least one hour. This leads to frustrations with other users and at the end to multiple printing because “the printer cannot handle the job” (in reality he was still in the processing). Due to that there was a lot of multiple printing which meant a lot of wastepaper and also burdened the quota.
- The unequal treatment of computer science students and all other students can finally be settled by the fact that all user have the same printing quota of 50 free pages per month on the HP-laserprinter.
The printer is directly next to the door in the C005-pool and should normally always be turned on. In the following the essentially steps for the use of the printer.
- Sending of the printing job to the queue Drupierer-Mensakarte using lp -d Drupierer-Mensakarte. If you want to print multiple input pages on one output page, e.g. for slide collections, the parameters ar -o number-up=2, -o number-up=4 or -o number-up=16 for 2, 4 or 16 input pages on one output pages. Example: lp -d drupierer -o number-up=4 capter1.pdf sends the PDF-file “chapter1.pdf” to the printer-queue. In this case there will be always four input pages on one output page.
- If the printer is not switched on this can be done with the corresponding button on the side. Attention: the printer needs some “warm-up time”. Normally the printer is turned on. If there is a small lamp blinking the printer is in the sleeping mode and can be activated with the button next to the small lamp.
- Now you can go to the device and put your TUD-card in the upper reader. The device should show you the credit balance of the card.
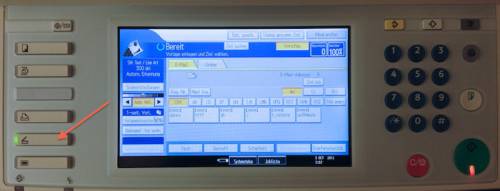
- If the printer is not in the “Netzwerk-Druckjobs” mode you can activate this mode in the Panel on the left side (Look at the following figure).
- Now the list of all the printing jobs that are available at the moment are displayed. You can browse through the list with the arrow buttons on the right side. It's also possible to get the entries sorted or restrict the list to your own username by the “Suche n. Anwendername”-button. The username, the date, the approximated moment of the job and the computer, from which the job was sended are the displayed data of the printing job. By clicking on a job you choose a job that you want to print.
- Due to the fact that all printing jobs are provided with a pin you have to enter the pin after selecting the printing jobs. The pin is 0000
- To avoid misprints which will be potentially expansive you can use the mode “Erste Seite drucken”. Some slide collections might not be in the right order anymore after arranging several slides on one page.
- Using the button “Druckereinstellung” in the buttom right on the display you can make additional settings. This includes in particular double-sided printing (Duplex), which can be activated with the “2-seitige Kopie Oben-Oben” and the result will be the same as the double-sided printing on a HP-printer. Additional you can add for example divideres. Generell speaking you have to do “trail and error”.
- If you're fine with the settings you can start the printing job with the green button. To cancle the job click on the red button. But the printer is a little slow so the canceling will Happen after a few pages because they were already printed.
- After the printing you can delete all files that you don't need anymore with the “Dateien löschen”-button. All files on the document server will be deleted automatically after 24 hours.
- Last but not least you should remove your TUD-card by clicking on the stop button in the reader.
scanning
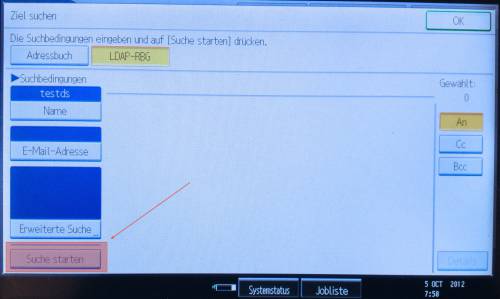
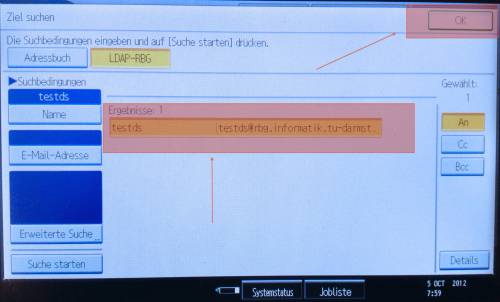
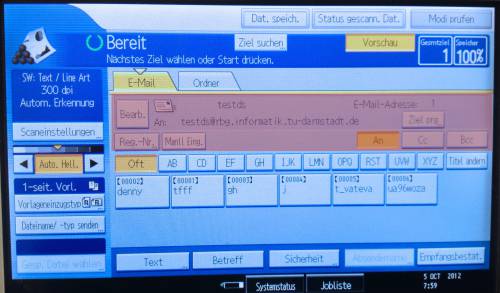
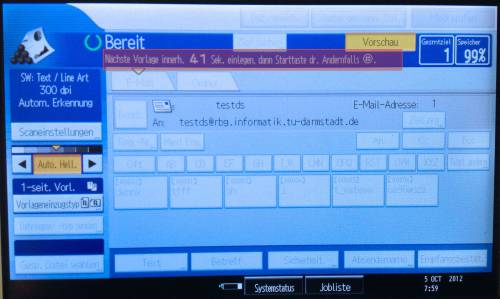
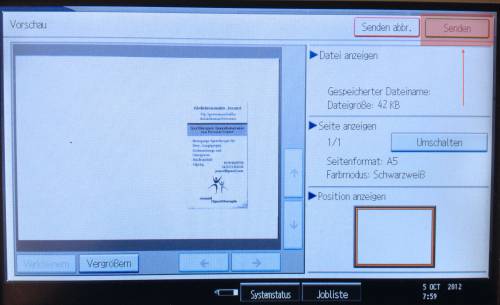
- Documents can also be scanned and send via mail to a certain adress:
- Now you have to click on the Green button on the right by the number buttons
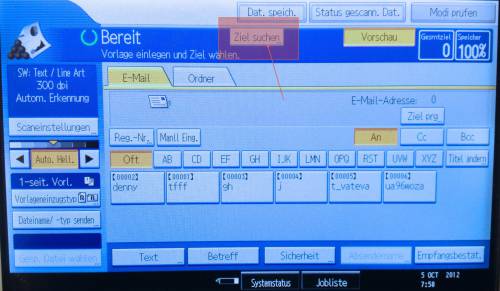
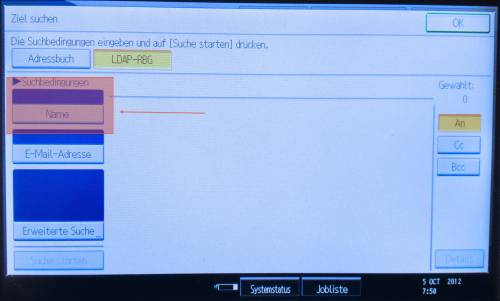
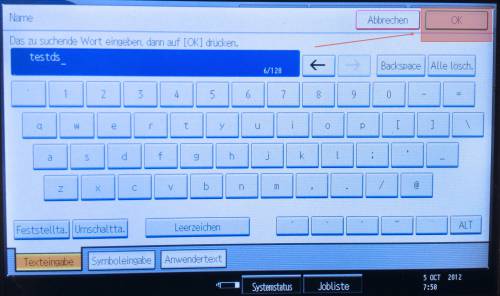
- In the same picture in the upper right you can send the mail
FAQ's
- Does the quota of 50 sites also apply on the Aficio-device?
- Yes, if you choose the printer C005.
- Does the System support the Mensa-card?
- No, not anymore.
- AIf there are technical problems who do I contact?
- Please send a mail directly to sysop@rbg.informatik.tu-darmstadt.de. Only if we are informed we can get active. Please remember that we do read the forum of the students representiv council but not all the time. If there are technical issues you can reach us the fastest via mail or if you call us (16-4166).
- Is the device able to do more than printing?
- Yes, it's also possible to copy (Mode will be activated with the button above the button for network printing jobs) and scan (bottom button). For both options the TUD-card has to be in the reader. However scanning something does not debit but allows to send the pictures or PDFs via mail to an adress added by th user.
- Is this a Computing offer to the library?
- No, we cooperate with the library in the priceing.
- Do I really have to put the card in the reader? The booking should be possible contactless?
- The current technical states makes it necessary to enter the card entirely in the reader to activate the contact switch for the reading of the card. The reader doesn't constantly test if there is a card (something is lying on the device), but will be activated by the contact switch. This is also for your safety if your card is in or next to the device and somebody else wants to print …
- Do the coveersheets from HP-printers cost money?
- The Aficio does not create a coversheet per default because the print job can be tracked down to the user via the username. Due to that fact the question superfluous. Coversheets added by the user do cost money because they were explicitly added be the user.
- Can I print from my laptop?
- Yes, look at the tutorial above.
- Can I print in colors?
- Non, printing is only possible in black and white.
